📦 Installation
Warning
Please read the 🔏 Data Privacy section before proceeding with this step, in order to understand whether CliMB is compatible with your data and use case.
Installation on company/organization systems
It is common within organizations to have certain restrictions on installing software on their systems, or to impose some restrictions on accessible URLs through VPNs or firewalls. If you are facing such restrictions when trying to install CliMB by following the steps below, please ask your IT department for assistance.
In order to use CliMB, you need to accomplish the following three steps:
1. 🐍 Set up the conda environments
CliMB uses conda to manage the Python environments. Before installing CliMB, you need to set up two conda environments as follows.
If you do not have
conda(“Anaconda”) installed on your system, you should install theminicondadistribution by following the appropriate instructions below.Follow the Installing on Windows guide.
We recommend you use the “Miniconda” installer.
“Verify your installer hashes” step is optional.
Follow the Installing on macOS guide.
We recommend you use the “Miniconda” installer.
“Verify your installer hashes” step is optional.
Follow the Installing on Linux guide.
We recommend you use the “Miniconda” installer.
“Verify your installer hashes” step is optional.
Create the main conda environment for CliMB:
Running commands
If you are not familiar with running commands in a terminal (a.k.a. command prompt, command line interface etc.), please see this tip box for a quick overview of the appropriate terminal to use on your operating system. The commands shown in CliMB documentation should work with the terminals described here.
Note: these are terminal commands, and not Python shell (REPL) commands.
You do not need to type in the comment lines, e.g.
# Create the environment:, these are for your information only.On Windows, you should use Anaconda PowerShell Prompt.
You can find this by searching for “Anaconda PowerShell Prompt” in the Start menu.

To launch a command line terminal, you can follow this Execute commands and run tools in Terminal on Mac.
For more details, see the Terminal User Guide.
The specifics of launching the terminal differs between different versions of Linux.
E.g. on Ubuntu, follow this guide.
For other distributions, please find the appropriate guide online.
# Create the environment:
conda create -n climb python=3.10 -y

# Install a dependency needed for PDF generation:
conda install -n climb conda-forge::weasyprint -y
Python
3.10or newer should be set.Known installation issue on Windows systems
There is a known installation issue on Windows systems related to the WeasyPrint package, which can cause the PDF report generation functionality to not work. This can be resolved by following this troubleshooting step.
Create a separate
condaenvironment that will be used for code execution:Caution
The exact environment name
climb-codemust be used.# Create and activate the environment, Python `3.10` or newer should be set: conda create -n climb-code python=3.10 -y # Install some standard packages in the environment. If more packages are needed by generated code, those will be automatically installed by the tool. conda install -n climb-code pandas numpy matplotlib seaborn scikit-learn shap -y
CliMB will automatically use this environment when executing the generated code.
2. 🔑 Obtain the API keys for the third-party LLM
Warning
Please read the 🔏 Data Privacy section before proceeding with this step, in order to make an informed decision about which LLM provider is suitable for your use case.
CliMB currently supports the following third-party LLM providers:
More LLM providers and open source models will be supported in the future.
Tip
Please select between the tabs (“OpenAI”, “Azure OpenAI Service” etc.) below to see the instructions for the LLM provider you have chosen.
Enterprise subscriptions
Your organization may have an enterprise subscription with OpenAI. If so, please follow the instructions provided by your IT department to obtain the API key. The instructions in this section are for a personal OpenAI account.
Sign up for OpenAI platform here.
Fund your account by following this guide.
Follow this guide to get your API key.
⚠️ Never share your API key with anyone and treat it as a “password”. A reminder to developers to to never commit your API keys to a public repository!
Make note of this key as it is needed later.
Enterprise subscriptions
Your organization may have an enterprise Azure subscription. If so, please contact your IT department to obtain access to the Azure Portal, and discuss with them the process of setting up an Azure OpenAI Service resource and deploying models on it. The instructions in this section are for a personal Azure account.
Caution
This set of steps may be tricky for non-technical users. If you are not comfortable with these steps, please ask your IT department for assistance.
The screenshots representing Azure’s UI/interface in Azure’s guides referred to here may not be exactly the same as what you see in your Azure Portal. This is because Azure’s UI is updated frequently. The steps should be similar, but the exact appearance may differ. Carefully following the text instructions should still allow you to complete the process successfully.
Create an Azure account here.
Create an Azure OpenAI Service resource by following the steps in the official guide and this user-friendly unofficial guide.
At the Configure network security step, Allow all networks is easiest and should be acceptable for most users.
At the final “Deploy a model” step, we recommend selecting
gpt-4,gpt-4o, or better (gpt-3.5is not recommended due to poor performance). More specifically, please select one of these supported versions.For instance:
gpt-4o-2024-08-06in supported versions list means modelgpt-4and model version2024-08-06in Azure.Make note of the ⓪ model type and version (e.g.
gpt-4o-2024-08-06) you set up here as it is needed later.
When you are deploying the model, make note of the ① deployment name that you use as it is needed later.
-
New UI as of Nov 2024: click the resource name at the top right of the screen to find: ② endpoint and ③ key, make note of these as they are needed later.
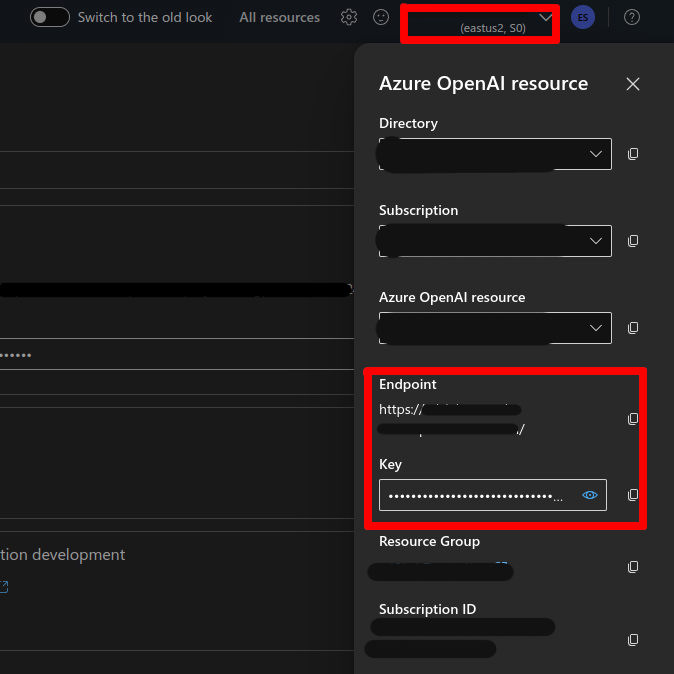
Old UI as of Nov 2024: click the gear icon near the top right of the screen to reveal the “Resource” panel. In the list of resources, you will see the row with the current resource. Copy and make a note of: ② endpoint and ③ key.

⚠️ Never share your API key ③ with anyone and treat it as a “password”. A reminder to developers to to never commit your API keys to a public repository!
3. 📈 Install the CliMB package
Clone the CliMB repository and navigate to the directory (we will call this the repo directory)
# Clone the repository:
git clone https://github.com/vanderschaarlab/climb.git

# Navigate inside the repo directory:
cd climb
Activate the main
condaenvironment and install the package itself (this will install all the dependencies as well):# Activate the main environment: conda activate climb # Install the CliMB package: pip install -e .
Finally, you need to set up the configuration file for the LLM provider you chose.
Copy the Example
.envfile to the repo directory. Note that it should be placed directly inside theclimbfolder, not inside any subfolder; please see the end of this subsection below to check what your repo directory should contain at the end of the configuration process. On Windows you may wish to rename this file tokeys.envto avoid the file being hidden / extension confusion.Configure CliMB to work with the LLM provider you chose by following the instructions in the appropriate tab below.
Open the
.env/keys.envfile in the repo directory and replace the value ofOPENAI_API_KEY="API_KEY_FOR_OPENAI"
with the key you obtained. Make sure to replace the text
API_KEY_FOR_OPENAIbut keep the quotes (e.g. if your key isabc123, the line should look likeOPENAI_API_KEY="abc123").Tip
For any values that you need to replace in this section, make sure to keep the quotes.
For example, if you need to replace
API_KEY_FOR_AZURE_ENDPOINT_1withabc123, the line should look like:AZURE_OPENAI_API_KEY__my-endpoint-1="abc123".Open the
.env/keys.envfile in the repo directory.AZURE_OPENAI_API_KEY__my-endpoint-1="API_KEY_FOR_AZURE_ENDPOINT_1"
Update the value
"API_KEY_FOR_AZURE_ENDPOINT_1"with the ③ key you obtained.Replace
my-endpoint-1template with the ID of the endpoint you are actually using. For example, if your endpoint ishttps://my-clinic.openai.azure.com/, use themy-clinicpart. In this example case, the line would look like:AZURE_OPENAI_API_KEY__my-clinic="your actual ③ key"
Copy the Example
az_openai_config.ymlfile to the repo directory. Note that it should be placed directly inside theclimbfolder, not inside any subfolder; please see the end of this subsection below to check what your repo directory should contain at the end of the configuration process.Open the
az_openai_config.ymlfile in the repo directory:models: - name: "your-custom-name" endpoint: "https://my-endpoint-1.openai.azure.com/" deployment_name: "your-deployment-name" api_version: "2024-02-01" model: "gpt-4-0125-preview" # Any lines with a '#' are comments and are just for your information.
The fields in this file are explained below. What you need to set the values to is shown in italics below. Note: you should not remove the quotation marks around the values.
name: This is used to identify the model in the UI. It will appear asconfig_item_namewhen you select theazure_openai_v1engine in 🗨️ Session Management (see 🚀 Quickstart Guide - Start a new session). You can set this to any value you like.endpoint: This identifies a URL needed to connect to the API. Set this to the ② endpoint you obtained.deployment_name: This is the name of the deployment you set up in the Azure OpenAI Portal. Set this to the ① deployment name you obtained.api_version: This is the version of the API protocol you are using. You can find the possible values for this field here (more info here) It is recommended to set this to the latest version available.model: This needs to match the model type and version you set up in the Azure OpenAI Portal. It should be formatted exactly as the matching version from supported versions. For example, usegpt-4-0125-previewif you deployed agpt-4model and set the version to0125-preview. This field should be set to ⓪ model type and version from earlier.
At the end of the configuration, your repo directory should looks something like this:
climb/
├─ config_examples/
├─ docs/
├─ ...
├─ tests/
.coveragerc
.gitignore
...
.env  # Or, keys.env. The main configuration file.
az_openai_config.yml  # If using Azure OpenAI Service, its configuration file.
...
setup.py
tox.ini
📦⏫ Updating CliMB
To update to the latest version of CliMB, navigate to the repo directory, then follow these steps:
Pull the latest changes by running:
git pullUpdate the package:
# Activate the environment:
conda activate climb
# Update the package:
pip install -U -e .
🖥️ System Requirements
CliMB is compatible with Windows, MacOS, and Linux operating systems.
CliMB and the tools it uses can work on a range of hardware configurations, but we recommend the following rough minimum requirements for a smooth experience:
a CPU with at least 4 cores,
16GB of RAM,
NVIDIA GPU with at least 4GB of memory (not strictly necessary, but recommended for much faster performance).
Better hardware will provide a more performant experience, especially when working with large datasets or complex models.
Particularly large datasets will push the RAM and GPU RAM requirements higher, so please keep this in mind when working with your data.